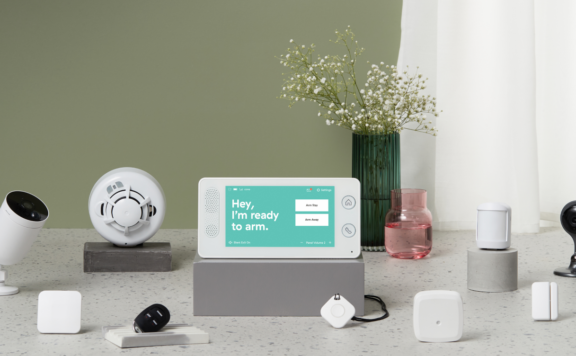
An “away” scene is useful only after the alarm, sensors, cameras, locks, notifications, power backup, and human response path have each been tested. Apple Home can coordinate supported devices, but it does not turn every accessory into an alarm or guarantee that a notification reaches the right person. Use this checklist before leaving a primary home for a night, a weekend, or a longer trip.
Away-mode controls at a glance
| Layer | What must work | Departure proof |
|---|---|---|
| Sensor-led alarm | Correct doors, windows, motion zones, local siren, arming mode, and response path | Arm, trigger one approved test event, receive the right alarm, and restore the system |
| Apple Home | Correct home, home hub, household roles, scenes, automations, and remote access | Run the away scene, check every resulting state, then verify remotely from mobile data |
| Cameras | Recording path, useful first frame, retention, privacy zones, offline alert, and export rights | Create a test event and save the clip before leaving |
| Locks and access | Door alignment, battery, named codes, physical key, temporary access, and revocation | Lock and unlock locally, verify the door latched, and test the backup credential |
| Power and network | Router, home hub, alarm hub, cameras, backups, restart order, and lost-cloud behavior | Document what remains local during internet and safe AC-loss tests |
| Human response | Named contact, address, alarm instructions, pet information, key access, and escalation | Run a call or message drill and confirm the contact can act without broad admin rights |
Twenty-four to forty-eight hours before departure
- Open the alarm, Apple Home, camera, lock, router, and monitoring apps; resolve battery, offline, tamper, storage, plan, and firmware notices.
- Check every exterior door and accessible window for alignment, loose magnets, damaged frames, blocked contacts, or weak adhesive.
- Walk each approved motion zone with pets, fans, heating or cooling, curtains, and normal lighting active.
- Trigger one planned camera event; confirm the first useful frame, clip length, timestamp, recording location, retention, and export.
- Test every named lock code and the physical fallback. Remove old guest, cleaner, contractor, and house-sitter credentials.
- Review who can arm, disarm, unlock, view cameras, change automations, invite users, or recover the account.
- Update emergency contacts, address, pet notes, permit information, and travel dates with the service where required.
Build a safe HomeKit away scene
Keep the scene short and observable. A useful away scene may turn off selected lights, set a safe thermostat mode, adjust approved shades, and enable supported camera recording or notifications. It should not hide an open-door fault, silence a life-safety alarm, disable a required light, or depend on an automatic lock action without confirming the door is fully closed.
Record every accessory the scene changes and its accepted final state. Run the scene while standing inside the home, inspect each door and lock physically, and create a separate return scene. Use Apple’s current Home app overview as a product reference, then test the exact devices, software versions, home hub, region, and vendor apps installed in the property.
Keep the alarm path independent
A HomeKit scene, geofence, camera classification, or push notification should not be the only way the household learns about an intrusion. Verify the local alarm, sensor processing, siren, backup communication, and response plan separately. Buyers who need a sensor-led DIY system can compare the Abode Smart Security Kit and current Abode plans.
Review every rule with the home-security automation checklist. Remove duplicate noise without hiding entry, camera-offline, hub-offline, smoke/CO, leak, low-battery, tamper, or alarm events by using the HomeKit notification audit.
Internet and power failure test
Disconnect internet during an approved test and record what happens to local sensors, siren, lock control, camera recording, Home automations, remote access, notifications, and monitoring communication. Then safely simulate an AC outage if the equipment and household permit it. Time alarm-hub, router, home-hub, camera, and lock backup behavior. Restore power and internet in the documented order and confirm every device reconnects without leaving a door, alarm mode, or camera in the wrong state.
Do not assume that “No Response” in Apple Home means the local accessory has stopped working, or that a responsive tile proves the alarm path is healthy. Treat local state, HomeKit state, vendor-app state, and monitoring state as separate checks.
House sitter and emergency access
Give the minimum access needed for the exact dates. Prefer a named, scheduled code or limited household role over a shared owner password. The contact should know how to enter, disarm, handle a false alarm, identify a smoke/CO or leak alert, reach the owner, call emergency services, and secure the property after an event. They should not need camera history, account recovery, automation editing, or permanent unlock rights unless their job requires it.
Use the emergency contact plan to define the escalation order and the HomeKit emergency-access checklist to test phones, hubs, locks, and recovery before departure.
Ten-minute final departure checklist
- Walk every exterior door, patio door, accessible window, garage entry, and gate; close and latch each one.
- Check the alarm for open, bypassed, tamper, low-battery, offline, and trouble zones.
- Run the away scene, inspect every lock physically, and verify the correct alarm mode.
- Confirm cameras are in the intended privacy and recording state and that storage is available.
- Check smoke/CO, leak, temperature, and power alerts where installed; never disable life-safety warnings for travel.
- Verify the primary and backup contacts, temporary access dates, and physical key location.
- Leave, switch the phone off Wi-Fi, and verify alarm, lock, camera, home-hub, and critical notification status over mobile data.
Responding to an alert while away
Read the event type, device name, location, time, and current system state before acting. Follow the monitoring provider’s instructions and call emergency services for an immediate threat. Do not ask a neighbour or house sitter to confront an intruder, enter a smoke- or CO-affected building, or investigate a dangerous condition. Save relevant clips and event records without changing the only copy; the camera evidence-export checklist covers timestamps, context, retention, and privacy-safe sharing.
If the event is false, record the cause and fix it after safety is confirmed. Use the false-alarm reduction checklist before re-arming rather than simply muting the alert.
Return-home test
- Approach normally and confirm the expected camera or entry event appears.
- Use the planned credential, disarm once, and verify the alarm mode actually changes.
- Inspect the home for entry, water, power, temperature, smoke/CO, and device-fault signs before dismissing alerts.
- Run the return scene and confirm lights, thermostat, shades, locks, cameras, and privacy settings individually.
- Remove temporary access, revoke any unneeded household role, and confirm the old code or session fails.
- Review missed, delayed, duplicate, offline, and low-battery alerts; record fixes and the next test date.
Build a travel handoff that survives a missed notification
An away scene is only one step in a travel security plan. The stronger test is whether the household can identify an event, confirm what happened, reach the right person, and restore the system when the owner’s phone is offline. Write the handoff before departure and test it with the exact phones, apps, alarm modes, cameras, locks, and contacts that will be used.
Separate five kinds of authority
| Authority | What the person may do | What to avoid |
|---|---|---|
| Alarm response | Receive an alarm, confirm the address, follow the monitoring instructions, and call emergency services for an immediate threat | Giving broad Apple Home or vendor-account ownership just to answer an alarm |
| Property entry | Use one named, dated credential and secure the door after the visit | Shared owner passwords, permanent codes, or an untracked spare key |
| Camera evidence | View or export only the event needed for the response | Giving every helper access to all cameras, history, household routines, and private rooms |
| Device recovery | Restart approved equipment in a written order and report the result | Factory resets, account removal, or deleting the Apple Home while the owner is away |
| Account recovery | Use the household’s documented owner-recovery process | Treating an Apple Account recovery contact as an Apple Home resident or security-system administrator |
Use the Apple Account recovery-contact checklist to keep recovery authority separate from Home and alarm permissions. Review the HomeKit emergency-access checklist for phones, hubs, locks, and vendor apps.
Create a one-page travel response card
Store one digital copy and one protected local copy. Keep it short enough to use during an alert. Include:
- Property address, unit, gate, and safe approach notes.
- Primary and backup contact names, time zones, and call order.
- Monitoring provider name, account reference, verbal-password handling rule, and test-mode procedure.
- Named alarm zones, camera names, lock names, and the location of the local siren and hubs.
- The exact temporary credential, its active dates, and who is allowed to use it.
- Pet, smoke/CO, water, temperature, medical, and mobility notes that change the response.
- The approved router, Apple home hub, alarm hub, and camera restart order.
- A rule that no helper confronts an intruder or enters a smoke-, CO-, fire-, or flood-affected property.
The home-security emergency contact plan provides the call tree. Remove recovery secrets, full account passwords, and unrelated camera access from the response card.
Map every alert to one first action
| Alert | First check | Next action |
|---|---|---|
| Entry or alarm | Zone, time, armed state, monitoring event, and any safe camera context | Follow the alarm-response plan; call emergency services for an immediate threat |
| Camera motion | First useful frame, event length, timestamp, and whether an entry sensor also changed | Save relevant evidence; do not dispatch a helper based only on an unclear clip |
| Lock event | Named credential, door state, lock state, and alarm state | Contact the credential owner; secure the door through the planned path |
| Hub or internet offline | Which system is offline and which local functions still work | Use the approved restart order; avoid resets or Home deletion |
| Low battery or tamper | Device, zone, remaining function, and whether the property can wait | Schedule a safe visit or switch to the documented backup coverage |
| Smoke/CO, leak, or temperature | Exact device and location; any corroborating alert | Follow life-safety instructions and keep people out of a dangerous building |
Audit the final alert set with the HomeKit notification checklist. Tune duplicate convenience alerts without hiding alarm, life-safety, offline, tamper, battery, access, or power failures.
Prove that the remote view matches the physical home
- Close and latch every protected opening, then compare the physical state with the alarm and Apple Home state.
- Use the window-sensor placement guide to retest any opening that shows an intermittent or reversed state.
- Run the away scene and confirm each accessory one by one. A scene reporting success is not proof that a door latched or an alarm armed.
- Leave Wi-Fi, use mobile data, and check the alarm mode, critical sensors, locks, cameras, home hub, and current alerts.
- Ask the backup contact to read the same event from their assigned account. Confirm that they can see enough to act but cannot change unrelated settings.
Use a two-channel evidence rule
When an alert matters, save the event record from the alarm or vendor app and the relevant camera clip or snapshot when available. Record the time zone, device name, observed state, and who handled the event. Keep the original file unchanged and share a working copy that excludes unrelated people, audio, rooms, and household routines.
The HomeKit camera evidence-export checklist covers retention, timestamps, incident indexes, and privacy-safe sharing. Do not change camera settings or delete the only clip while the incident is active.
Set return-home controls before leaving
Write the return sequence while the system is healthy. Specify which credential opens the door, whether the alarm is disarmed before or after entry, which scene restores normal lighting and temperature, and how temporary access is removed. Keep a manual route available if geofencing, mobile data, Apple Home, the vendor cloud, or the smart lock is unavailable.
After returning, revoke the travel code and unneeded Home role, review the event timeline, fix missed or delayed alerts, replace weak batteries, restore privacy settings, and schedule the next test. If an event was false, use the false-alarm reduction checklist before changing notification or sensor rules.
Run a 60-minute HomeKit travel handoff drill
- Minutes 0–10: Walk the doors, windows, locks, cameras, alarm panel, Apple home hub, router, and life-safety alerts. Clear unexplained faults.
- Minutes 10–20: Run the away scene, arm through the approved alarm path, and verify every final state physically and in each app.
- Minutes 20–30: Create one planned entry event. Confirm the local siren or test response, remote notification, named zone, camera context, and evidence export.
- Minutes 30–40: Move the owner’s phone off Wi-Fi. Have the backup contact receive, identify, and escalate the event using only their assigned access.
- Minutes 40–50: Run an approved internet-loss test. Record which alarm, lock, camera, automation, notification, and monitoring functions remain available.
- Minutes 50–60: Restore service, use the planned return path, revoke temporary access, and confirm the old credential fails.
Do not leave the property in travel mode until the right contact receives the right alert, can explain the first action, and can recover from a missed push notification without owner credentials.
Block departure if any of these remain unresolved
- An exterior opening reports the wrong state or requires an unexplained bypass.
- The alarm, Home, vendor app, and physical device disagree about armed, locked, or recording state.
- The only response depends on one phone, one push service, one internet path, or one owner account.
- A helper needs permanent admin rights or a shared owner password.
- Camera storage, retention, timestamps, or export cannot be verified.
- The power or internet test leaves an unknown alarm, lock, camera, or home-hub state.
- The household has no tested manual entry, disarm, call, or return-home path.
FAQ
Can HomeKit arm every security system automatically when I leave?
No. Support and permitted actions vary by alarm, accessory, vendor app, home hub, region, and software version. Test the exact setup and keep a visible manual confirmation step.
Should an away scene lock the door automatically?
Only if the installed lock, door alignment, permissions, household routine, and fallback have been tested. A motor turning does not prove the door was fully closed or latched.
What alerts should stay on during travel?
Keep actionable alarm, entry, smoke/CO, leak, temperature, power, hub-offline, camera-offline, tamper, low-battery, and access alerts appropriate to the installed system. Audit duplicates without hiding failure warnings.
Can a house sitter use my owner login?
Avoid sharing the owner account. Give a named, time-limited code or minimum household role and remove it after the trip.